Increase Virtual Disk Size of an Image
Clear Linux* OS pre-built images come in different sizes, ranging from 300 MB to 20 GB. This guide describes how to increase the disk size of your pre-built image if you need more capacity. We will use the KVM image as an example to demonstrate the process of increasing disk size and expanding the last partition to take up the added space.
Determine disk size and list of partitions
There are two methods to find the disk size and the list of partitions of a pre-built Clear Linux OS image.
Method 1: Use lsblk on the VM
The first method is to boot up your VM and execute the lsblk command as shown below:
lsblk
An example output of the lsblk command:
NAME   MAJ:MIN RM  SIZE RO TYPE MOUNTPOINT
fd0      2:0    1    4K  0 disk
sr0     11:0    1 1024M  0 rom
vda    254:0    0  8.6G  0 disk
├─vda1 254:1    0  510M  0 part
├─vda2 254:2    0   33M  0 part [SWAP]
└─vda3 254:3    0    8G  0 part /
An example of this can also be seen in Figure 1.
Method 2: Look at the image configuration YAML file
The second method to look at the image configuration YAML file that was used to produce the image.
For example, to find the size of the KVM image version number 31880, follow these steps:
Go to the releases repository.
Drill down into the 31880 > clear > config > image directory.
Download and open the
kvm.yamlfile.Locate the targetMedia section.
The example shows a total disk size of 8.54 GB, 512 MB for the EFI partition, 32 MB for the swap partition, and 8 GB for the root partition.
 1targetMedia:
 2- name: ${bdevice}
 3  size: "8.54G"
 4  type: disk
 5  children:
 6  - name: ${bdevice}1
 7    fstype: vfat
 8    mountpoint: /boot
 9    size: "512M"
10    type: part
11  - name: ${bdevice}2
12    fstype: swap
13    size: "32M"
14    type: part
15  - name: ${bdevice}3
16    fstype: ext4
17    mountpoint: /
18    size: "8G"
19    type: part
Increase virtual disk size
Before you can expand the last partition of your image, you must make space available by increasing the virtual disk size. After that, you can resize the last partition and finally resize the filesystem. Follow these steps:
Increase virtual disk size
Shut down your VM.
Use the process defined by your hypervisor or cloud provider to increase the virtual disk size of your Clear Linux OS VM.
Power up your VM.
Resize the last partition of the virtual disk
Log in.
Open a terminal window.
Add the storage-utils bundle to install the parted and resize2fs tools.
sudo swupd bundle-add storage-utils
Launch the parted tool.
sudo partedIn the parted tool, perform these steps:
Press p to print the partitions table.
If the warning message below is displayed, enter Fix.
Warning: Not all of the space available to :file:`/dev/sda` appears
to be used, you can fix the GPT to use all of the space (an extra ...
blocks) or continue with the current setting?

Fix/Ignore?
Enter resizepart <partition number> where <partition number> is the number of the partition to modify.
Enter the new End size.
Note
If you want a partition to take up the remaining disk space, then enter the total size of the disk. When you print the partitions table with the p command, the total disk size is shown after the Disk label.
An example of this can be seen in Figure 1.
Enter q to exit parted when you are finished resizing the partition.
Figure 1 depicts the described steps to resize the partition of the virtual disk from 8.5 GB to 30 GB.
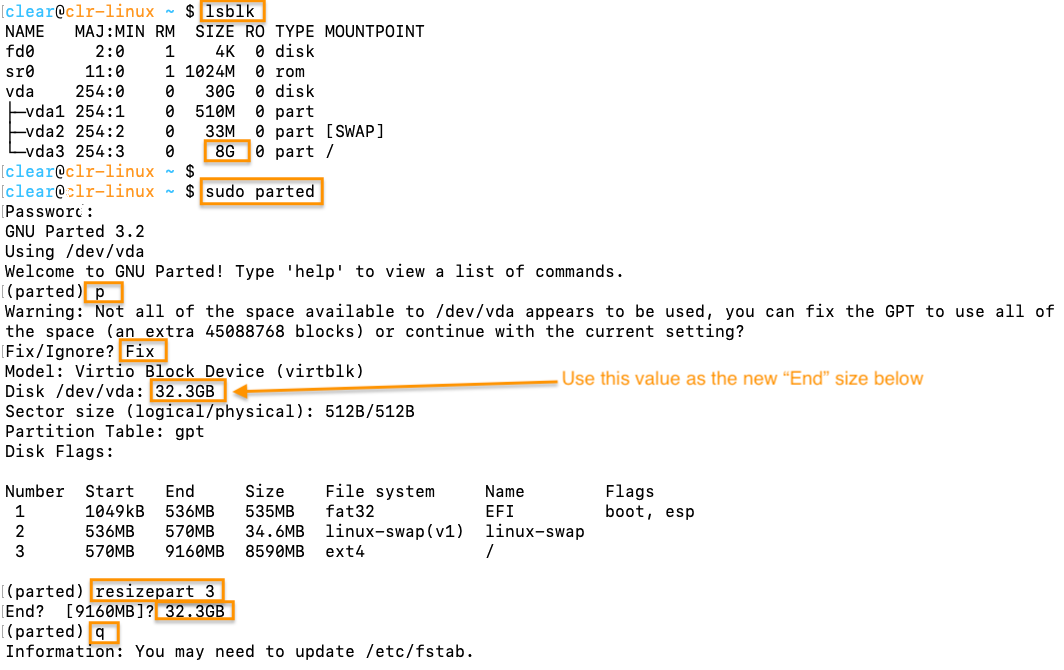
Figure 1: Increase root partition size
Resize the filesystem
Enter sudo resize2fs -p /dev/<modified partition name> where <modified partition name> is the partition that was changed in the parted tool.
Run lsblk to verify that the filesystem size has increased.
Figure 2 depicts the described steps to resize the filesystem of the virtual disk from 8.5 GB to 30 GB.
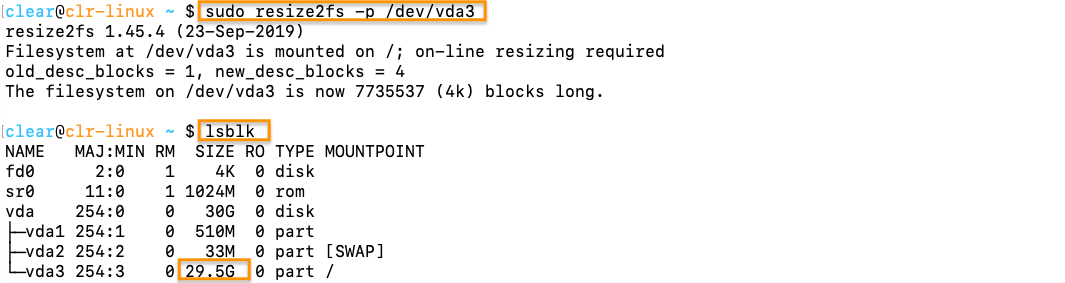
Figure 2: Increase root filesystem with resize2fs
