HPC Cluster
This tutorial demonstrates how to set a simple HPC cluster using Slurm, MUNGE, and pdsh. For this tutorial, this cluster consists of a controller node and four worker nodes, as shown in Figure 1. For the sake of simplicity, each node resides on a separate host and their hostnames are hpc-controller, hpc-worker1, hpc-worker2, hpc-worker3, and hpc-worker4.
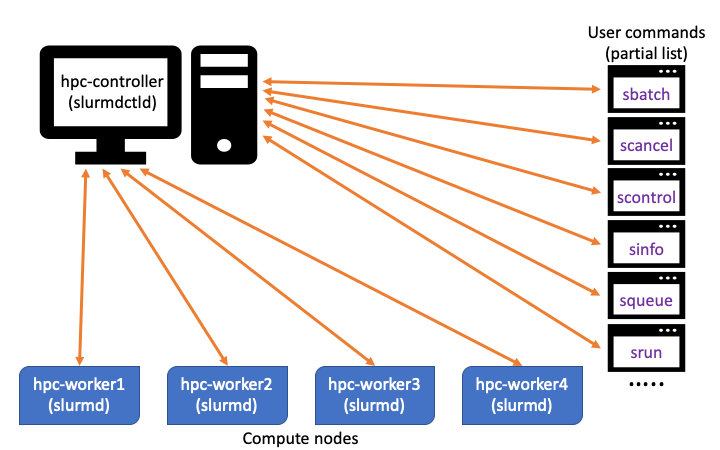
Figure 1: Simple HPC cluster
The configuration is intentionally kept simple, notably avoiding setting up cgroups and accounting. These and many more additional configuration options can be added later.
Note
This tutorial assumes you start with a new installation of Clear Linux OS for all nodes.
Prerequisites
Knowledge and experience with HPC
Familiarity with Slurm, MUNGE, and pdsh
All nodes have synchronized clocks (typically by NTP)
Set up controller node
In this step, install the cluster tools, configure and enable the MUNGE service, and enable the Slurm controller service.
Install Clear Linux OS on the controller node, add a user with adminstrator privilege, and set its hostname to hpc-controller.
Boot it up and log in.
Update Clear Linux OS to the latest version.
sudo swupd update
Set the date and time to synchronize with an NTP server.
sudo timedatectl set-ntp true
Install the cluster-tools bundle.
sudo swupd bundle-add cluster-tools
Create a MUNGE key and start the MUNGE service.
Create the MUNGE key.
sudo mkdir /etc/munge
dd if=/dev/urandom bs=1 count=1024 | sudo tee -a /etc/munge/munge.key
Set the ownership to munge and set the correct access permissions.
sudo chown munge: /etc/munge/munge.key
sudo chmod 400 /etc/munge/munge.key
Start the MUNGE service and set it to start automatically on boot.
sudo systemctl enable munge --now
Test MUNGE.
Create a MUNGE credential.
munge -nExample output:
MUNGE:AwQFAAC8QZHhL/+Fqhalhi+ZJBD5LavtMa8RMles1aPq7yuIZq3LtMmrB7KQZcQjG0qkFmoIIvixaCACFe1stLmF4VIg4Bg/7tilxteXHS940cuZ/TxpIuqC6fUH8zLgUZUPwJ4=:Validate a MUNGE credential.
munge -n | unmunge | grep STATUS
Example output:
STATUS: Success (0)
Start the Slurm controller service and enable it to start automatically on boot.
sudo systemctl enable slurmctld --now
Set up worker nodes
For each worker node, perform these steps:
Install Clear Linux OS on the worker node, add a user with adminstrator privilege, and set its hostname to hpc-worker plus its number, i.e. hpc-worker1, hpc-worker2, etc.
Ensure the username is the same as the one on the controller node. This is needed to simplify password-less-SSH-access setup, which is needed for pdsh, in the next section.
Boot it up and log in.
Update Clear Linux OS to the latest version.
sudo swupd update
Set the date and time to synchronize with an NTP server.
sudo timedatectl set-ntp true
Install the cluster-tools bundle.
sudo swupd bundle-add cluster-tools
Set up password-less SSH access and pdsh on all nodes
To efficiently manage a cluster, it is useful to have a tool that allows issuing the same command to multiple nodes at once. And that tool is pdsh, which is included with the cluster-tools bundle. pdsh is built with Slurm support, so it can access hosts as defined in the Slurm partitions. pdsh relies on password-less SSH access in order for it to work properly. There are two ways to set up pasword-less SSH authentication: key-based or host-based. In this case, the latter approach will be used. The controller authenticates a user and all worker nodes will trust that authentication and not ask the user to enter a password again.
Configure the controller node.
Log into the controller node.
Configure the SSH service for host-based authentication.
sudo tee -a /etc/ssh/ssh_config << EOF
HostbasedAuthentication yes
EnableSSHKeysign yes
EOF
Restart the SSH service.
sudo systemctl restart sshd
Configure each worker node.
Configure SSH service for host-based authentication.
sudo tee -a /etc/ssh/sshd_config << EOF
HostbasedAuthentication yes
IgnoreRhosts no
UseDNS yes
EOF
Create the
/etc/hosts.equivfile and add the controller’s FQDN. This tells the worker node to accept connection from the controller.For example:
hpc-controller.my-domain.comSet its permission to root access only.
sudo chmod 600 /etc/hosts.equiv
Add the controller’s FQDN to
/root/.shosts. This allows host-based authentication for the root account so that actions requiring sudo privileges can be performed.sudo cp -v /etc/hosts.equiv /root/.shosts
Using the controller’s FQDN in
/etc/hosts.equiv, scan for its RSA public key and copy it to/etc/ssh/ssh_known_hosts. Verify the scanned RSA public key matches the controller’s/etc/ssh/ssh_rsa_key.pubfile.sudo ssh-keyscan -t rsa -f /etc/hosts.equiv > ~/ssh_known_hosts sudo cp -v ~/ssh_known_hosts /etc/ssh rm ~/ssh_known_hosts
Restart the SSH service.
sudo systemctl restart sshd
On the controller node, SSH into each worker node without having to enter a password. At the first-time connection to each host, you’ll be asked to add the unknown host to the
$HOME/.ssh/known_hostsfile. Accept the request. This is will make future SSH connections to each host be non-interactive.ssh <worker-node>Note
Setting up host-based authentication on CSP environments such as Microsoft Azure and Amazon AWS may require some tweaking on the worker nodes’ SSH configurations due to the CSP’s virtual network setup. In general, cloud VMs have a public and private DNS name. When SSH’ing from the controller to a worker node, the SSH client may send the controller’s private DNS name, usually something with “internal” in the name, as the chost instead of its public FQDN as expected in worker node’s
/etc/hosts.equiv,/root/.shosts, and/etc/ssh/ssh_known_hostsfiles. If the above configurations do not work, meaning you’re asked to enter a password when SSH’ing from the controller to a worker node, on a cloud VM, here are some suggestions for debugging the problem:On the controller, try to identify the chost data sent by the SSH client using ssh -vvv <worker-node>. Look for chost in the debug log. If the chost value is different than the controller’s FQDN listed in worker node’s
/etc/hosts.equiv,/root/.shosts, and/etc/ssh/ssh_known_hostsfiles, then that is likely the cause of the problem. In some cases, chost data may not be shown. If so, it’s safe to assume that the SSH client is using the controller’s private DNS name as the chost. Proceed to steps 2 and 3 below to fix the problem.Get the controller’s private DNS name either by the above step or by getting it from your system administrator.
On the worker node, make these changes:
Change the controller’s FQDN in
/etc/hosts.equiv,/root/.shosts, and/etc/ssh/ssh_known_hoststo its private DNS name.Restart the SSH service on the worker node.
Retest the connection from the controller node to the worker node. If that still doesn’t work, try the SSH directive HostbasedUsesNameFromPacketOnly yes which tell the SSH service to accept the supplied host name as is and not try to resolve it. Also, set the directive UseDNS to no to disable host name lookup.
Verify you can issue a simple command over SSH without typing a password.
Issue the hostname command.
ssh <worker-node> hostname
Issue the hostname command with sudo.
ssh <worker-node> sudo hostname
In both cases, you should get a response with the worker node’s hostname. If the sudo version requires additional permission, grant the user NOPASSWD privilege. For example:
Edit the sudoer file.
sudo visudoAdd the following:
<user> ALL=(ALL) NOPASSWD: ALL
Create slurm.conf configuration file
On the controller, create a new slurm.conf configuration file
that contains general settings, each node’s hardware resource information,
grouping of nodes into different partitions, and scheduling settings for
each partition. This file will be copied to all worker nodes in the cluster.
Create a base
slurm.confconfiguration file.sudo mkdir -p /etc/slurm sudo cp -v /usr/share/defaults/slurm/slurm.conf /etc/slurm
Add the controller information.
sudoedit the
slurm.conffile. Set the ControlMachine value to the controller’s resolvable hostname.For example:
ControlMachine=hpc-controllerNote
Assuming the controller’s FQDN is resolvable, specifying the controller’s IP address with the ControlAddr key is optional. However, it maybe helpful to add it.
Save and exit.
Add the worker nodes information.
Create a file containing a list of the worker nodes.
cat > worker-nodes-list << EOF
hpc-worker1
hpc-worker2
hpc-worker3
hpc-worker4
EOF
Using pdsh, get the hardware configuration of each node.
pdsh -w ^worker-nodes-list slurmd -C
Example output:
hpc-worker4: NodeName=hpc-worker4 CPUs=1 Boards=1 SocketsPerBoard=1 CoresPerSocket=1 ThreadsPerCore=1 RealMemory=1915
hpc-worker4: UpTime=0-01:23:28
hpc-worker3: NodeName=hpc-worker3 CPUs=1 Boards=1 SocketsPerBoard=1 CoresPerSocket=1 ThreadsPerCore=1 RealMemory=1663
hpc-worker3: UpTime=0-01:33:41
hpc-worker2: NodeName=hpc-worker2 CPUs=1 Boards=1 SocketsPerBoard=1 CoresPerSocket=1 ThreadsPerCore=1 RealMemory=721
hpc-worker2: UpTime=0-01:34:56
hpc-worker1: NodeName=hpc-worker1 CPUs=1 Boards=1 SocketsPerBoard=1 CoresPerSocket=1 ThreadsPerCore=1 RealMemory=721
hpc-worker1: UpTime=0-01:39:21
sudoedit the
slurm.conffile. Append each worker node information, but without the UpTime, under the COMPUTE NODES section.Tip
It is strongly recommended to set the RealMemory value for each worker node slightly below, say 90%, what was reported by slurmd -C in case some memory gets use by some processes, which would cause Slurm to make a node not available due to its memory resource falling below the stated value in the configuration file.
Here’s an example with four worker nodes:
#
# COMPUTE NODES (mode detailed values reported by "slurmd -C" on each node)
NodeName=hpc-worker1 CPUs=1 Boards=1 SocketsPerBoard=1 CoresPerSocket=1 ThreadsPerCore=1 RealMemory=648
NodeName=hpc-worker2 CPUs=1 Boards=1 SocketsPerBoard=1 CoresPerSocket=1 ThreadsPerCore=1 RealMemory=648
NodeName=hpc-worker3 CPUs=1 Boards=1 SocketsPerBoard=1 CoresPerSocket=1 ThreadsPerCore=1 RealMemory=1497
NodeName=hpc-worker4 CPUs=1 Boards=1 SocketsPerBoard=1 CoresPerSocket=1 ThreadsPerCore=1 RealMemory=1723
Create partitions.
A Slurm partition is basically the grouping of worker nodes. Give each partition a name and decide which worker node(s) belong to it.
For example:
PartitionName=workers Nodes=hpc-worker1, hpc-worker2, hpc-worker3, hpc-worker4 Default=YES MaxTime=INFINITE State=UP
PartitionName=debug Nodes=hpc-worker1, hpc-worker3 MaxTime=INFINITE State=UP
Save and exit.
Set the ownership of the
slurm.conffile to slurm.sudo chown slurm: /etc/slurm/slurm.conf
On the controller node, restart the Slurm controller service.
sudo systemctl restart slurmctld
Verify the Slurm controller service restarted without any issues before proceeding.
sudo systemctl status slurmctld
Copy MUNGE key and slurm.conf to all worker nodes
On the controller node, using pdsh, in conjunction with the list of
defined nodes in the slurm.conf, copy it and the MUNGE key to
all worker nodes.
On the controller node, copy the MUNGE key to all worker nodes and start the MUNGE service.
Create the
/etc/munge/directory on each node.sudo pdsh -P workers mkdir /etc/munge
Copy the MUNGE key over.
sudo pdcp -P workers /etc/munge/munge.key /etc/munge
Set the ownership of the
munge.keyfile to munge.sudo pdsh -P workers chown munge: /etc/munge/munge.key
Start the MUNGE service and set it to start automatically on boot.
sudo pdsh -P workers systemctl enable munge --now
Verify the MUNGE service is running.
sudo pdsh -P workers "systemctl status munge | grep Active"
Example output:
hpc-worker3:      Active: active (running) since Wed 2020-04-15 19:47:58 UTC; 55s ago
hpc-worker4:      Active: active (running) since Wed 2020-04-15 19:47:58 UTC; 55s ago
hpc-worker2:      Active: active (running) since Wed 2020-04-15 19:47:59 UTC; 54s ago
hpc-worker1:      Active: active (running) since Wed 2020-04-15 19:47:59 UTC; 54s ago
On the controller node, copy the
slurm.conffile to all worker nodes and start the slurmd service on them.Create the
/etc/slurm/directory on each worker node.sudo pdsh -P workers mkdir /etc/slurm
Copy the
slurm.conffile over.sudo pdcp -P workers /etc/slurm/slurm.conf /etc/slurm
Set the ownership of the
slurm.conffile to slurm.sudo pdsh -P workers chown slurm: /etc/slurm/slurm.conf
Start the Slurm service and set it automatically start on boot.
sudo pdsh -P workers systemctl enable slurmd --now
Verify the slurmd service is running.
sudo pdsh -P workers systemctl status slurmd | grep Active
Example output:
hpc-worker3:      Active: active (running) since Wed 2020-04-15 19:39:22 UTC; 1min 17s ago
hpc-worker4:      Active: active (running) since Wed 2020-04-15 19:39:22 UTC; 1min 17s ago
hpc-worker2:      Active: active (running) since Wed 2020-04-15 19:39:23 UTC; 1min 17s ago
hpc-worker1:      Active: active (running) since Wed 2020-04-15 19:39:23 UTC; 1min 17s ago
Verify controller can run jobs on all nodes
Check the state of the worker nodes.
sinfo
Example output:
PARTITION AVAIL  TIMELIMIT  NODES  STATE NODELIST
workers*     up   infinite      4   idle hpc-worker[1-4]
debug        up   infinite      2   idle hpc-worker[1,3]
Tip
If the nodes are in a “down” state, put them in the “idle” state.
For example:
sudo scontrol update nodename=hpc-worker[1-4] state=idle reason=""
Additional Slurm troubleshooting tips.
And finally, verify Slurm can run jobs on all 4 worker nodes by issuing a simple hostname command.
srun -N4 -p workers hostname
Example output:
hpc-worker4
hpc-worker3
hpc-worker1
hpc-worker2
Create and run example scripts
Example 1: Return the hostname of each worker and output to show-hostnames.out
On the controller node, create the Slurm
show-hostnames.shscript.cat > show-hostnames.sh << EOF #!/bin/bash # #SBATCH --job-name=show-hostnames #SBATCH --output=show-hostnames.out # #SBATCH --ntasks=4 #SBATCH --time=10:00 #SBATCH --mem-per-cpu=100 #SBATCH --ntasks-per-node=1 srun hostname EOF
Execute the script.
sbatch show-hostnames.shThe result will appear on the first node of the partition used. As no partition was explicitly specified, it would be the default partition.
View the result.
pdsh -w hpc-worker1 "cat show-hostnames.out"
Example output:
hpc-worker1: hpc-worker3
hpc-worker1: hpc-worker4
hpc-worker1: hpc-worker1
hpc-worker1: hpc-worker2
Example 2: An MPI “Hello, World!” program
On the controller node, create the
mpi-helloworld.cprogram.cat > mpi-helloworld.c << EOF #include <stdio.h> #include <unistd.h> #include <mpi.h> int main(int argc, char** argv) { // Init the MPI environment MPI_Init(NULL, NULL); // Get the number of processes int world_size; MPI_Comm_size(MPI_COMM_WORLD, &world_size); // Get the rank of the process int world_rank; MPI_Comm_rank(MPI_COMM_WORLD, &world_rank); // Get the name of the processor char processor_name[MPI_MAX_PROCESSOR_NAME]; int name_len; MPI_Get_processor_name(processor_name, &name_len); // Print a hello world message printf("Hello, World! from from processor %s, rank %d out of %d processors\n", processor_name, world_rank, world_size); // Finalize the MPI environment MPI_Finalize(); } EOF
Add the c-basic and devpkg-openmpi bundles, which are needed to compile it.
sudo swupd bundle-add c-basic devpkg-openmpi
Compile it.
mpicc -o mpi-helloworld mpi-helloworld.c
Copy the binary to all worker nodes.
pdcp -P workers ./mpi-helloworld $HOME
Create a Slurm batch script to run it.
cat > mpi-helloworld.sh << EOF
#!/bin/sh
#SBATCH -o mpi-helloworld.out
#SBATCH --nodes=4
#SBATCH --ntasks-per-node=1

srun ./mpi-helloworld
EOF
Run the batch script.
sbatch mpi-helloworld.shView the results on first worker node in the partition.
pdsh -w hpc-worker1 "cat mpi-helloworld.out"
Example output:
Hello, World! from from processor hpc-worker3, rank 2 out of 4 processors
Hello, World! from from processor hpc-worker4, rank 3 out of 4 processors
Hello, World! from from processor hpc-worker1, rank 0 out of 4 processors
Hello, World! from from processor hpc-worker2, rank 1 out of 4 processors
