Use DPDK to send packets between platforms
This guide describes how to send packets between two platforms.
Overview
Figure 1 shows how to send packets between two platforms in a simple configuration. The example uses the Data Plane Development Kit, which is a set of libraries, drivers, sample applications, and tools for fast packet processing.
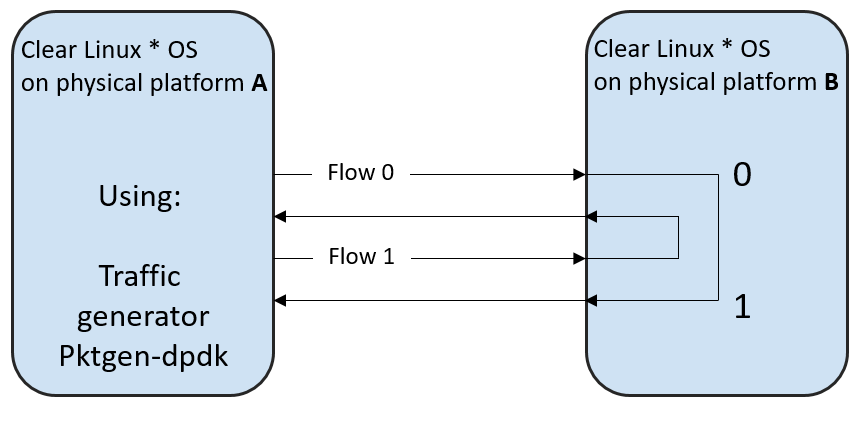
Figure 1: Environment for l3fwd DPDK application
This example uses the following DPDK components:
Prerequisites
Two platforms using Clear Linux* OS release 31130 or higher.
Both images must include the kernel-native bundle.
Install the following packages:
sudo swupd bundle-add network-basic-dev dpdk devpkg-dpdk
Each platform must have at least one NIC. Check the DPDK project for the list of supported dpdk.org NICs.
Two network cables.
Install dpdk and build l3fwd example (Platform B)
Change to the
l3fwdexample directory.sudo cd /usr/share/dpdk/examples/l3fwd
Assign
RTE_SDKvariable to the makefiles path.sudo export RTE_SDK=/usr/share/dpdk/
Assign
RTE_TARGETvariable to the location of the gcc* config file.sudo export RTE_TARGET=x86_64-native-linux-gcc
Build the l3fwd application and add the configuration header to the CFLAGS variable.
sudo make
Build pktgen (Platform A)
Download the pktgen tar package v3.1.2 or newer.
Decompress packages and move to uncompressed source directory.
Assign
RTE_SDKvariable to the path where makefiles are located.sudo export RTE_SDK=/usr/share/dpdk/
Assign
RTE_TARGETto the location of the gcc config file.sudo export RTE_TARGET=x86_64-native-linux-gcc
Build the pktgen project and set the CONFIG_RTE_BUILD_SHARED_LIB variable to “n”.
sudo make CONFIG_RTE_BUILD_SHARED_LIB=n
Bind NICs to DPDK kernel drivers (Platforms A and B)
The l3fwd application uses two NICs. The DPDK includes tools for binding NICs to DPDK modules to run DPDK applications.
Load the DPDK I/O kernel module.
sudo modprobe vfio-pci
Check the NIC status to determine which network cards are not busy. When another application is using them, the status shows “Active”, and those NICs cannot be bound.
sudo dpdk-devbind --status
Bind two available NICs. The general syntax for binding is: dpdk-devbind --bind=vfio-pci <device-entry>. A working example is shown below:
sudo dpdk-devbind --bind=vfio-pci 01:00.0
Check the NIC status to verify that the NICs are bound correctly. If successful, drv displays the value igb_uio, which confirms that the NICs are using the DPDK modules.
Set hugepages (Platforms A and B)
Clear Linux OS supports hugepages for the large memory pool allocation used for packet buffers.
Set the number of hugepages.
echo 1024 | sudo tee /sys/kernel/mm/hugepages/hugepages-2048kB/nr_hugepages
Allocate pages on NUMA machines.
echo 1024 | sudo tee /sys/devices/system/node/node0/hugepages/hugepages-2048kB/nr_hugepages
echo 1024 | sudo tee /sys/devices/system/node/node1/hugepages/hugepages-2048kB/nr_hugepages
Make memory available for DPDK.
sudo mkdir -p /mnt/huge $ mount -t hugetlbfs nodev /mnt/huge
For more information, refer to the DPDK guide System Requirements section.
Set up the physical environment (Platforms A and B)
Connect the NICs on Platform A to the NICs on Platform B using the network cables as shown in figure 2.
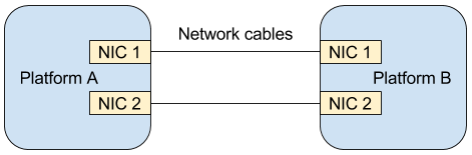
Figure 2: Physical network environment
Run l3fwd application (Platform B)
The l3fwd application is one of the DPDK examples available when you
install the dpdk-dev bundle. l3fwd forwards packets from one
NIC to another. For details, refer to the l3fwd documentation.
Open the l3fwd example directory.
sudo cd /usr/share/dpdk/examples/l3fwd
This step is very important.
DPDK needs poll mode drivers to operate.
Poll mode drivers are shared objects in
/usr/lib64.See the full list of supported NICs at dpdk.org NICs.
You must know which kernel module each NIC is using and choose a poll mode driver that corresponds to your NICs.
NIC binding and pktgen configuration depends upon network use cases and available system resources. Use the -d flag to set the poll mode driver.
The following example assumes that the NICs use the e1000 network driver and the e1000 poll mode driver. The
librte_pmd_e1000.sois located in/usr/lib64in Clear Linux OS.sudo ./build/l3fwd -c 0x3 -n 2 -d librte_pmd_e1000.so -- -p 0x3 --config="(0,0,0),(1,0,1)"
The l3fwd application shows port initialization details at startup. After port 0 initialization completes, l3fwd shows a MAC address and information for port 1.
Save the MAC address for configuring the pktgen project.
Run pktgen application (Platform A)
pktgen is a network traffic generator included in the DPDK.
pktgen configuration depends upon the network setup and the available system resources. The following example shows a basic configuration.
sudo ./app/app/x86_64-native-linux-gcc/pktgen -c 0xf -n 4 -- -p 0xf -P -m "1.0, 2.1"
Enable active colorful output (optional).
Pktgen> theme enable
Use the MAC addresses shown by the l3fwd application during initialization. The command to set the MAC addresses in pktgen has the format:
set mac <port number> <mac address>
Here is a working example:
Pktgen> set mac 0 00:1E:67:CB:E8:C9
Pktgen> set mac 1 00:1E:67:CB:E8:C9
Send packets.
Pktgen> start 0-1
For more details, see the pktgen documentation.
Appendix A: Use pass-through for virtual machines
This section explains how to set up a virtual environment where virtual machines control the NICs on the host.
Create a new directory and move to it.
Download or create a
start_qemu.shscript for running a kvm virtual machine:sudo curl -O https://cdn.download.clearlinux.org/image/start_qemu.sh
Download a bare-metal image of Clear Linux OS and rename it as
clear.img.Look for an Ethernet* device entry that contains vendor and device ID:
sudo lspci -nn | grep Ethernet
An example output:
03:00.0 Ethernet controller [0200]: Intel Corporation I350 Gigabit Network Connection [8086:1521]where 03:00.0 is the device entry and 8086:1521 is the vendor:device ID. Record this information, because you need it to unbind the NICs from a host.
Unbind the NICs from the host to do pass-through with virtual machines. Clear Linux OS supports this action. The commands take the format:
echo "vendor device_ID" > /sys/bus/pci/drivers/pci-stub/new_id
echo "entry for device" > /sys/bus/pci/drivers/igb/unbind
echo "entry for device" > /sys/bus/pci/drivers/pci-stub/bind
echo "vendor device_ID" > /sys/bus/pci/drivers/pci-stub/remove_id
Here is a working example:
echo "8086 1521" | sudo tee /sys/bus/pci/drivers/pci-stub/new_id
echo "0000:03:00.0" | sudo tee /sys/bus/pci/drivers/igb/unbind
echo "0000:03:00.0" | sudo tee /sys/bus/pci/drivers/pci-stub/bind
echo "8086 1521" | sudo tee /sys/bus/pci/drivers/pci-stub/remove_id
Assign the unbound NICs to the KVM virtual machine (guest). Modify the
start_qemu.shscript in qemu-system-x86_64 arguments, and add the lines with the host’s NICs information in the format:-device pci-assign,host="<entry for device>",id=passnic0,addr=03.0 -device pci-assign,host="<entry for device>",id=passnic1,addr=04.0
Here is a working example:
-device pci-assign,host=03:00.0,id=passnic0,addr=03.0 \
-device pci-assign,host=03:00.3,id=passnic1,addr=04.0 \
Add more NUMA machines to the virtual machine by adding lines to the Makefile boot target in the format:
-numa node,mem=<memory>,cpus=<number of cpus>
Here is a working example for a virtual machine with 4096 memory and four CPUs:
-numa node,mem=2048,cpus=0-1 \
-numa node,mem=2048,cpus=2-3 \
Note
Each NUMA machine must use the same quantity of memory.
Run the
start_qemu.shscript.
